Friday, December 20, 2013

Gear Review: Petzl Lynx Crampons

It’s ice climbing season and its time to dust the sharp things off.  I have already gotten out a couple days in the Salt Lake area and have gotten a chance to play on my Petzl Lynx crampons.  While these are not a new product, they were new to me last season and I had many good days to test them out.  To be honest, I am still relatively new to ice climbing and I definitely take advantage of any advances in gear.  I have to say, these crampons have truly helped me take my ice climbing skills to the next level and my confidence has increased as a result of these new toys. 


Aside from their excellent performance these crampons also excel in a number of different ways.  The number one reason to purchase these crampons is their versatility.  The crampons can be modified with just one screw to be in dual point mode in short, long or asymmetrical position or mono-point mode in short or long position.  Personally, I use them in dual point mode in the long position and find that they work great in the WI 3- 5 range.  Additionally, these crampons can fit boots with or without toe welts as the front bindings are interchangeable between a stainless steel toe bail for boots with toe welts and a flexible binding for boots without toe welts.  All you need is a boot with a heel welt as the rear binding is the super smooth leverlock hail bail, which is also height-adjustable.  I primarily use them on the La Sportiva Nepal Evo in a size 39.5 and they fit perfect.

Other great features include front and rear antisnow plates to prevent snow build-up and an easy to adjust bar to help facilitate adjustment.  At 14 points, these crampons feel extra secure while on the sharp-end.  The Petzl Lynx weigh in at 1080 g (2.4 lbs) and are lighter than similar models like the Black Diamond Cyborg.

On the downside, these crampons are not cheap and cost $245.  But given that you are essentially getting two-plus crampons in one actual crampon, some people may consider it a bargin!


Bottom Line:  These are the crampons for you if you want performance and versatility. Now lets go climbing!

Monday, October 21, 2013

Alpine Rock Climbing in Chamonix


I left for France in late July with plans to meet up with Jonathon in Chamonix, a mecca for world class and accessible alpine climbing.  Jonathon has spent the last four summers guiding in Chamonix but has spent limited time doing any personal climbing.  I had been there two years ago for a brief trip but was excited to see more of the range.  Plane tickets were purchased, gear was packed, dollars were exchanged into Euros and logistics were finalized.  We had two weeks to play in the French Alps!

We had a couple goals and peaks in mind but were ultimately most excited to take advantage of climbs that were in the best condition.  Knowing that France had a very snowy winter, we knew that north facing rock climbs would likely not be in condition.  However, snowy winters also lend itself to less complex glacier travel.  I tend to be drawn to long rock climbs that climb high above glaciers.  Unbeknownst to me, the options were unlimited in this realm.  With a weather forecast calling for primarily high pressure for the next several days, we packed our 40 L backpacks full of rock climbing gear, clothes, topos and snack food.

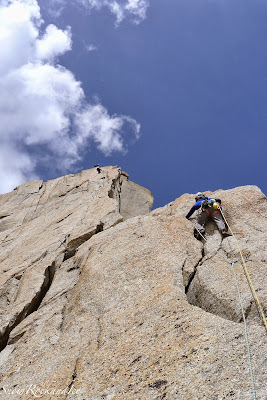
Alpine climbing in France is a unique experience and quite different from the climbing common in the United States.  One main difference is that lifts or trams are used to access the majority of the terrain.  For our first mission, we rode up the Aiguille du Midi tram for 6000 feet depositing us at 12,605 feet.  After getting off the tram, we harnessed up and got our crampons on and walked down onto the Vallee Blanche glacier.  A pleasant hour-long walk on the glacier brought us to the base of our first objective, the Contamine route on Pointe Lachenal.  Jonathon led up through the 5.10+ cruxes as I struggled to catch my breath still not quite acclimated to climbing at 12,000 feet.  

Jonathon on the first pitch of the Contamine route
 Nine pitches later, we were on the summit after climbing one of the best crack climbs we had ever climbed.  The climbing combined with the sunny weather reminded us of climbing in California.  Unfortunately our sunshine ended on the descent as we rappelled back to glacier.  The skies opened up and it hailed on us as we completed our final rappels.  There was lightening off in the distance and we quickly packed up our gear in preparation for the uphill slog to the Cosmiques Hut.


Midway up on the Contamine route

Following the upper crux pitch on the Contamine route
Staying in huts is another unique part of the French climbing experience that is not all that common in the United States.  While they are more expensive than camping, it does eliminate that need to pack camping gear, cooking gear and food.  After getting pretty wet from the fierce hail storm it was a nice relief to know that we could easily dry out our gear in the cozy hut and eat a hot meal prepared by the hut caretakers.  There are also all sorts of other treats and alcoholic beverages available at these huts.  Who doesn't want a glass of hot wine after a day in mountains?

The next day we woke up to gray skies and we slowly packed up our gear in preparation for the trek to another hut across the valley.  The sky's began to reluctantly clear and we decided we would try to fit in another climb on the Chandelle du Tacul.   After climbing four fantastic pitches full of great cracks, we found ourselves off route with absolutely no idea where we were on this granite spire.  Feeling motivated, Jonathon forged ahead on loose terrain eventually finding an overhanging offwidth/chimney system that contained an old wooden ladder attached by some old pins.  Who knows how long that had been there, but we both pulled on it to get ourselves through that burley section.  After a much longer day than expected, we found ourselves perched on top of a tiny granite spire.  We rappelled over our intended line and we both felt like kicking ourselves after seeing how clean this route looked.  At the bottom, we re-examined our topo and realized there was some blatant errors in the topo.  Note to self; do not trust topos from Mont Blanc Super Cracks.

Jonathon following pitch two on Chandelle du Tacul

Jonathon leading pitch 3 before we were lost on the Chandelle du Tacul
With the weather still looking good for one more day, we knew that we would need to rally to fit in one more objective.  The next day we woke up early for an attempt on the Grand Capucin, a beautiful golden granite pillar.  There were many other parties that also had the same idea and we got in line behind a nice Swiss guide and his client.  Fortunately there was no getting off route on this day, as the Swiss guide had been up this route many times.  I led up through the first scrambly section and to the top of the first crux pitch.  The climbing got better and better as we got higher and higher.  Unfortunately it got colder and windier and more crowded with other climbing parties.  At one point I was leading up through 5.10 terrain in my puffy jacket right on the heals of the previous climber.  Meanwhile another party had started leading up behind me.  I guess this is the French way and I did my best not to let the stress of all the people and cold get to me.  Eventually the routes diverged and we finished the Swiss Route via the Sole Mio culminating with several hundreds of feet of crack and face climbing on some of the best granite we had ever climbed.  Five hours after we left the ground, we crouched on the tiny summit psyched to have completed an objective we had both wanted to climb for quite some time!  About ten overhanging 50 m rappels took us back to our boots and crampons.  We quickly packed up our packs and literally raced up the glacier to catch the last tram down into Italy avoiding the long slog back to the tram to Chamonix.  We were able to catch a ride with some of the friends we made on route and they drove us through the tunnel back to Chamonix for some much needed rest days.

Leading up high on the Grand Capucin

Beginning the rappels from the top of the Grand Capucin

All smiles after finishing an awesome day! The Swiss route goes up the left most part of the spire.
It conveniently rained for the next several days so we could rest our tired bodies and sore hands.  We entertained ourselves with some trail runs and sport climbing on the limestone cliffs down valley.  I also gorged myself on the French cousine including lots of cheese and gelato.

We had about four more days until I had to leave and Jonathon had to go back to work.  Hoping to squeeze in a couple more climbs, we hatched a plan to head up to the Envers Hut, known by the French locales as a little Yosemite.  We took the train up to the top of the Mer de Glace.  The French know how to make terrain accessible and sturdy iron ladders and iron structures have been drilled into the vertical rock faces leading down onto the glacier.  These via ferrata type structures make passage onto the glacier possible.  After walking through the glacier, there is another ladder system that leads out of the glacier.  The hike to the hut concludes with switchbacks through beautiful alpine meadows. 
Climbing ladders through the fog on the way to the Envers Hut

Views on the way to the Envers Hut

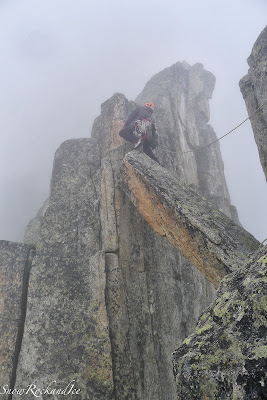
The sky's teased us that day, clearing at times but ultimately we arrived to dreary and overcast weather.  After getting our stuff situated at the hut we picked n small objective that was just a mere 5 minute walk from the hut on Tour Verte.  While the climbing was just average, the route involved walking across the bridge of sighs.  Essentially, a large granite block is wedged precariously between two granite spires, with an impressive amount of air below to add to the exposure.  Jonathon and I both marveled at how wild it was that this block was still in this unique position as its only a matter of time until erosion works its course.  We both quickly tip-toed across the bridge.  We continued climbing the route in a light drizzle and topped out as the skies were starting to clear.

Tip-toeing across the bridge of sighs

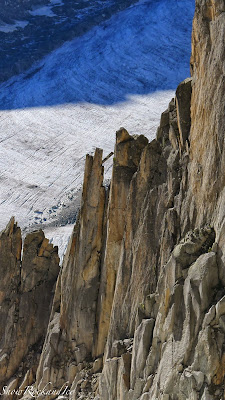
A better view of the bridge of signs from our climb the next day

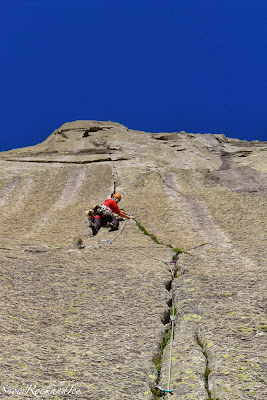
The next day we prepared for our longest objective of the trip on Aguille Roc on a route called Pedro Polar.  The approach was 30 minute hike up the steep and firm glacier cumulating with a challenging step across from the overhanging snow slope onto the rock formation.  Jonathon led up through a couple tricky slabby pitches and finished his block with a super classic 100-foot hand crack.  I then took over for the crux pitches beginning with a challenging finger crack, some run out traversing slab climbing and a beautiful pitch of primarily well bolted 5.11 face climbing.  I was in the zone and all the stresses from work and life were forgotten for those moments.  At that point, life was simple and the beauty of the mountains and athletic nature of the climbing motivated me to push myself.  It is this sort of meditative focus that keeps me coming back to the sport for more and more.  Jonathon and I smiled and laughed after the crux pitches were finished knowing that we were both thoroughly enjoying our time with each other in a beautiful setting.  We finished the remaining eight pitches of mostly 5.9 - 5.10 crack climbing to the top of the peak.  We snapped a few photos and hugged and began the rappels back to our boots.  Everything came together for this day of climbing; a great route, a great partner, and splitter weather. 

Jonathon leading on the first pitches on Pedro-Polar

Jonathon leading the splitter 5.10 hand crack midway up Pedro-Polar

Leading one of the crux pitches mid-way up Pedro-Polar

Smiles on the upper part of Pedro-Polar
Feeling sore and satisfied, we had a mellow final day in the mountains and hiked back to town that afternoon for a final gourmet French dinner.  All told, we summited all of 5 of our objectives and climbed 50 pitches up to 5.11 not including sport climbs.  While Jonathon and I have climbed a lot together, this was one of our first times climbing this type of terrain together.   I was proud of what we had accomplished together and was pleased with our ability to work well as a team.  In this partnership, I found that we were able to push and support each other to step out of our comfort zones, while also recognizing the moments when it was important for one of us to take charge and pick up the slack when one of us was fatigued.  I look forward to many more alpine adventures with this guy. 

In fact, just two weeks later we began a different sort of adventure when we celebrated the beginning of our marriage with our friends and family on the coast of Maine.  The lessons we take away from our climbing partnership easily translate to a partnership between husband and wife, where teamwork and an ability to provide uncompromising support are of utmost importance.  This trip and many of our other experiences together have built a solid foundation upon which to build a lifetime of dreams, goals and adventures together.  Jonathon, I can't wait for the next one!


As always, I must thank Patagonia and Petzl for providing me with the best gear possible.  And I of course must thank Jonathon for working hard to make this trip possible.  Without your strong work ethic, we wouldn't be able to travel like we do.

Summit shot on the Grand Capusin


Friday, August 16, 2013

Gear Review: Petzl Sirocco Climbing Helmet

The Sirrocco climbing helmet is one of Petzl's new products and it sure does deliver!  It is the lightest and most durable climbing helmet on the market while also being comfortable and breathable.  This combination results in one of the more innovative pieces of climbing gear to recently hit the market.


Photo: Doris Oberlander

At just 165 g (for a large), the helmet literally weighs nothing.  I can barely tell its on my head and the additional weight in my pack is not noticeable.  Given its light weight, one may question the safety of the helmet.  After all, that is why we all wear helmets.  Not to fear, this helmet is made out of expanded polypropylene.  Essentially this is some really durable foam that can withstand high impact resistance without losing its shape.  Unlike other helmets, that typically have a thin plastic exterior lining, this helmet is made out of just a single piece of foam resulting in a more durable product.  I've even seen people step right on the helmet with no signs of wear and tear!

The helmet also has a very unique and lightweight strap system.  The material for the straps is soft and comfortable and there is a magnetic buckle that keeps it all together.  While it's advertised that this buckle can be attached with one hand; it does take a little coordination.  Also, a couple times after I thought I had buckled my helmet I have noticed that it was just merely sitting on my head with the straps dangling around my ears.  Not ideal when you are 500 feet off the ground.  What I have noticed, is that it's important to keep the magnetic area clean and free of dirt so that it appropriately adheres.

Other nice features include:  a lightweight, yet reliable headlamp attachment points and removable foam pads that are washable.  It is very breathable and air flow is not compromised even on the hottest of days.  Believe me, I have tested this out during the heat of the Salt Lake City summer.  It is quite comfortable and does not limit my vision in any direction.  And it has held up well for many summer adventures including being thrown around in the dirt and stuffed in my backpack for extended trips.

I don't have too many complaints with the product except that it is probably the most dorky climbing helmet I have seen in a long time!  Will that stop me from wearing it....ummmm...No. But I did need to think about that a little bit.

Bottom line:  This is the helmet for you if you want the lightest, most durable and most comfortable helmet on the market.  Lets face it, climbers are not  very good at protecting their head.  With a helmet like the Sirocco, climbers have no excuse not to wear a helmet.  As a nurse in the ICU, I have seen too many head injuries that could have been prevented with helmets.  Doesn't everyone want to be rock climbing when they are 70?  I know I do and that is why I am going to wear my Sirocco in the mountains, on sketchy trad leads and top roping.


Sunday, July 28, 2013

The Tetons

Summer is hot in Salt Lake City and fortunately I was able to escape the heat for a couple days with a quick trip to the Grand Tetons.  Doris and I left Salt Lake City on a Tuesday morning.  About five hours later, we arrived in the hopping town of Jackson.  There is more traffic in this little town than Salt Lake City!  We quickly found the brewpub and began scheming about our plans for the next day.

It rained hard that night and the forecast was predicting showers for our first climbing day.  So we picked an objective that was able to be rappelled.  We woke early and began hiking into Death Canyon.  The hike was uneventful except we diverged from the main trail too early and ended up scrambling through some loose terrain.  However, our path did bring us to the belay right below the first pitch.  I racked up and began leading up the first pitch of the Snaz.  The climbing was straightforward and a bit wondery and dirtier than I expected on such a well travelled route.  But I guess this is alpine climbing!  By the third pitch, the climbing had cleaned up and I led up a hard 5.9 off width capped by an exciting roof move!


Start of the 3rd pitch on the Snaz.  Photo: Doris Oberlander

The reminder of the pitches involved good rock climbing through a couple roofs, an awkward wide and flaring chimney and some easier ground.  After completing all eight pitches, we began the rappels to the  ground.  On the hike out, the skies opened up and it rained hard on our sweaty bodies.  The warm air and rain showers felt so refreshing!


Doris finishing up pitch 3 or 4 on The Snaz


Views of the hike out of Death Canyon

Feeling a bit tired and knowing that we had to drive back to Salt Lake City the next day, we picked an objective that hopefully wouldn't take a full day.  Again we woke early and started to long approach to Disappointment Peak in hopes of climbing the Open Book.  Our legs were tired from the almost 2 hour approach yesterday but we both didn't talk about that.  Instead we enjoyed the pleasant temperatures and clear blue skies that seemed to go on forever.  This time we easily found the approach trail and began hiking up through the talus to the base of the climb.  There was 100 - 200 feet of 4th class scrambling with a move or two of 5th class at the top of the scramble. The consequences were high so I opted to pull the rope out and keep it safe.  

The climb began with some classic 5.9 crack climbing and then continued through some wandering features for almost a full rope length.  Pitch two was fun 5.8/5.9 liebacking and stemming.  I combined pitch 3 and 4 into one longer pitch as pitch 3 was very short and the belay would have been completely hanging.  This turned pitch 3 into one very fun 5.9 crack climb!  I belayed at a large sloping ledge.  Pitch 4 began with a huge undercling and then through some crack systems trending right.  I thought this was going to take us to a place where we could unrope but there was one more easy 5th class pitch that brought us to the top of the route.  We were both super impressed with the quality of the climbing on this one.  I would say its been my favorite rock route in the Tetons out of the 3 I have done (Irene's Arrete and the Snaz).  As a bonus, the descent was straightforward.  A simple scramble down the backside of the lower flanks of Disappointment Peak led us to a nice trail that skirted through beautiful alpine lakes and streams.  Lower down on the trail we saw a bear munching on the berries!  


Doris on Pitch 3.


Navigating the big undercling on pitch 4. Photo: Doris Oberlander.
Finally our tired bodies arrived at the car.  We stretched out our legs and began the long drive back to Salt Lake City.  While there is tons of climbing in Salt Lake, I have missed the mountains and the long days and adventures that come with alpine climbing.  It was nice to satisfy that need to travel through mountainous terrain, get high off the ground and have an adventure.  I'll be back for more.

Tuesday, May 14, 2013

Harness Gear Review: Petzl Selena and Luna


Rock climbing season is underway and Petzl conveniently released their updated harness line at just the right time. I've had the opportunity to check out the new women's harnesses on a variety of climbs this spring and I'm happy to report that Petzl has succeeded in turning a good product into a great product.  Here is the breakdown of each harness. 

The Selena:

A medium harness weighs 370 grams and is primarily designed for sport climbing given its limited padding and non-adjustable leg loops. In terms of other features, the harness is designed with an automatic double back system that has started to become the norm for newer harnesses. This feature decreases the chance of user error and makes the process just a tiny bit faster when getting ready for a climb. There are four gear loops, two are rigid and two are flexible.  The gear loops are large and sturdy enough to carry a big desert rack.  This is an improvement from the older version that had smaller gear loops.  There is also a small haul loop that works perfect for trailing a tag line or carrying shoes and extra gear. The leg loops are attached to the waist belt with elastic straps and an easy-to-release buckle that makes taking a bathroom break quite simple.  Additionally, there are two ice clipper slots on each side. 


Climbing the third pitch on Jah Man. Photo Sara Rouvinen


I have ended up using this harness for quite a bit of trad climbing, primarily on desert towers and cracks where the rack is quite heavy.  I have found it to be a great trad climbing harness as I tend to prefer non-adjustable leg loops to adjustable leg loops.  I find that this style of leg loop is less bulky and allows more flexibility and movement while rock climbing.  The material used is a combination of EVA foam padding and mesh-type material. It is quite lightweight and breathable but still offers support in hanging belays.  The harness is designed with a women's frame in mind and the waist belt is wider at the sides to better distribute the weight.  While I don't find any harness all that comfortable, this harness in particular was not noticeable uncomfortable and is quite a bit more comfortable than the previous model.

Although the material is very durable looking on the belay loop, I did notice a couple small scuff marks after climbing several chimneys and offwidths.  This does not compromise the safety of the harness in any way but I was surprised to see these scuff marks after climbing a couple desert towers.  Another issue i had with the harness is that after the waist band is tightened down there is quite a bit of extra slack that remains hanging.  There is one loop to put the slack in but there are still several inches of slack that remains hanging, ending up getting in the way of the rack.  It would be nice if there was an additional loop to tuck this remaining slack out of the way.

All and all, I will continue to use this harness for sport and trad climbing because it is lightweight and comfortable with an adequate amount of features. Plus the bright purple color is pretty sweet!


Photo Sara Rouvinen

The Luna

A medium luna weighs 420 grams and is designed for all different types of climbing.  In particular, ice climbing and mountaineering are great uses for this harness due to the adjustable leg loops.  Aside from the adjustable leg loops, the other features of this harness are relatively similar to the Selena harness.  There are four gear loops, a small haul loop and two ice clipper spots.  The material used to construct the harness is also similar to the Selena although there is slightly more padding adding some additional comfort for hanging belays.  Likewise, the harness is designed for a women's specific frame by increasing the width of the waistbelt on the sides and increasing the length of the belay loop.


Climbing the Cloud Tower in Red Rocks

I have ended up using this harness primarily for trad climbing and haven't gotten a chance to use it for ice climbing and mountaineering.  In general, it fits similarly to the Selena harness and feels similarly comfortable.  This harness is a bit bulkier than the Selena due to the adjustable leg loops and I tend not to like this feature so much.  I have also found that it is difficult to actually be able to adjust the leg loops, e.g. the buckle is difficult to maneuver.  That being said, some folks really prefer adjustable leg loops because it is easier to get the harness on over boots and crampons.  Otherwise the features are ideal for climbing long routes with a large rack given the stiff gear loops and discreet haul loop.  I haven't used this harness as much as the Luna and have not seen any signs of wear on it.


Photo Sara Rouvinen

Bottom Line

Generally speaking, I would tend to recommend the Luna harness as a better all-around harness for someone newer to climbing.  For myself, I prefer the Selena out of the two.  Petzl has made some subtle but very key changes to these harnesess and they now are even better products than the previous models. Of note, I have found that the non-adjustable leg loops on the Petzl harness tend to run a little small.  I wear a medium in Petzl harnesses and I wear a small in other brand's harnesses.  These harnesses can be purchased at your local gear store or here.   See the Petzl website for more information.

Desert Tower Tour - The beginning of the season


Photo Sara Rouvinen

I always look forward to this time of year.  The days are longer and temps have warmed.  While I love skiing, snow and wintry activities, by mid-march I start to look forward to rock climbing season.  I get antsy to stick my hands into desert cracks, grab sharp crimpers, get high off the ground and soak up that spring time sunshine.

What better way to start the climbing season than a trip to Moab to climb some desert towers with a couple of psyched friends.  After working a couple night shifts, Sara picked me up and drove us down to the desert. I was in and out of a light sleep the entire ride but before I knew it we were making the familiar turn down highway 191 for the last leg of the drive.  While my energy was sub-par after a restless 4 hour nap, it was hard to say no to a couple pitches on Potash road as a warm up for the week to come.  We climbed a couple mellow routes and then found a campsite down the road.

There is nothing quite like sleeping out under the stars in the desert.  The temps are pleasant and the sky is clear from haze.  There is no cell phone service and its easy to clear the mind from the stresses of everyday life.  This is exactly what I needed.  We built a rack for our first objective: Jah Man on Sister Superior.  Darkness came and a wonderful sleep followed.

Twelve hours later, I started to feel like myself again.  We began the long hike into Jah Man.  It was about a two hour walk, half of it on a flat road-type feature and the other half ascended a steep talus slope.  Two years ago, I walked to the base of this route but was turned around by weather.  Today was different. We were in T-shirts and there wasn't a cloud in the sky.


All smiles on pitch 3.  Photo Sara Rouvinen.

Sara lead up the first 2 pitches, a short 5.9 pitch and then a slightly awkward but then fun 5.8 chimney. I lead the reminder of the route, climbing through some excellent 5.10 hand cracks and face climbing.  On the summit we hung out for a while and took in the views of that beautiful southwest landscape.


The following day we met up with my friend Doris and introduced her to crack climbing at the ice cream parlor in preparation for a climb up Castleton.

The next day, we woke up to cold and windy conditions....


Burr....

The sky was grey and rain was threatening.  Everyone was till psyched to continue and we drove to the base of Castleton for  a climb of the uber classic Kor-Ingals.  I remembered climbing this tower back in 2004 when climbing was still so fresh.  I had followed the crux off-width pitch and remembered being really happy that I wasn't leading it.  Well, today was my day to conquer my fear of wide cracks.  Lets just stay that it still felt just as strenuous as a grunted my way up the pitch.  At one point I took off my helmet ....


Photo Sara Rouvinen


On the summit, the sun came up and we laughed and jumped for joy on one of the most iconic of all desert towers.


I finished the trip with an ascent of The Lighthouse Tower via the Lonely Vigil.  This is a four pitch tower off the River Road with a very memorable and tiny summit! The tower starts with two excellent pitches of 5.10 that range from a little off-width to hand cracks to some truly desperate stemming on the second pitch.  I literally thought my legs were going to split apart during those moves!  The summit is reached by pulling an overhanging 5.8 mantle move to a tiny little pinnacle.  The exciting part is that there are no rap rings on top.  The 5.8 mantle move must be down climbed and the final piece of gear is rather far away.  Now I worked myself up for this move expecting to be terrified. It wasn't quite as bad as I expected and was totally worth getting up to that tiny point.


Lighthouse tower is the corkscrew looking tower in the center of the picture. Photo Doris Oberlander.

After we got back to the car, Doris and I drove back to Salt Lake City as reality needed to be faced.  But what a great escape from the hustle and bustle of the daily grind.

Monday, April 22, 2013

Trip Report: Cloud Tower and The Challenge


Mid-crux on pitch 4 of Cloud Tower

On April 10th, Jonathon and I escaped the Salt Lake City area in search of sunshine, warm temps, and rock climbing.  We drove down to Red Rocks, NV just outside Las Vegas.  We both really wanted to climb some long classic multi-pitch routes, since that is what Red Rocks is known for.  Jonathon has spent over 100 days climbing here, but I have only been here on a couple trips.  We wanted to climb some of the major classic routes like, Cloud Tower, Levitation 29, The Challenger, Risky Business and Dark Shadows. We only had a couple days so we knew we would not be able to climb all of them.  With the tempertures being in the mid 80's climbing in the shade was ideal.


We spent the first day warming up to the rock by single pitch climbing at the Second Pullout.   The next day we got on "The Challenge" which is located deep in Pine Creek Canyon on the Challenger Buttress.  Here is a breakdown of "The Challenge 5.10d"


The Challenge 5.10d, Pine Creek Canyon


This route follows an impressive corner system with delicate climbing at the 5.10 level. There is definitely some technical climbing above gear. Approach via Pine Creek and scramble up to the Challenger Wall. Approximently 1 hour.


Pitch 1: 5.10d Climb up broken slabs to the under cling through a roof. (0.4-0.5 BD cams) protects the roof move. 100 ft.


Pitch 2: 5.10d Climb up into the thin right facing corner above the anchor. Crux is about 30ft above belay. Small gear and RP's protect this section.  I thought this was the best trip! The crack easiest up to the anchor.  110 ft


                                                Rachel entering the crux on pitch 2 The Challenge


Pitch 3: 5.10b Traverse right 5ft off the belay to the next crack system. Follow up V groove with gear partially spaced to a large roof. The crux is pulling the roof out left which you can get a .5 and .75 just before the roof.  Reaching over the roof is quite a bit more challenging and intimidating for shorter folks.  Save a green C3 or another similar sized small cam for the tiny crack after the roof.  Otherwise you may find yourself about  20+ feet run-out and looking at a very unsafe fall.  Trust me, it was one of the more terrifying leads I have experienced. I even thought about jumping prior to pulling slippery face moves after the roof.  Another 15ft of face climbing leads you to the anchor. 90ft pitch.  


Pitch 4: 5.10b Technical stemming and balancing moves off the anchor for the first 30ft. Traverse right to easier terrain to the anchor. 70ft


Leading the balancy moves at the start of pitch 4
Rap the route with a single 70m rope.  Be careful pulling your rope on the second pitch.  We got our rope stuck in the crack and I had to lead that pitch again. Fortunately it was the best and easiest pitch!


Doubles in small gear is very helpful. Enjoy The Challenge!


The following day we got shut out from climbing due to high winds.  The forecast for the next day was looking good as the winds where expected to calm down.  We organized the gear for climbing the Cloud Tower.  I have wanted to climb this route for a while and was psyched to get on some hard pitches way off the ground.  The route is truly a classic with all the pitches being 5.10 or 5.11, except for the first two, which happen to be really good 5.8 pitches.  Here is the breakdown:.


Cloud Tower 5.11+

Pitch 1 and 2: 5.8. Can be linked with a 70 m using long gear and strategic gear placements.  Belay at the tree with slings on it. 210 ft.

Pitch 3:  5.10 -.  scramble up the broken 4th class terrain (30 ft) towards the amazing 2" hand crack splitting the headwall. Trend left on face holds to reach a bolted belay. 150 ft.

Pitch 4: 5.11+.  This is the crux pitch with a steep strenuous tips crack in a right facing corner.  Use the face holds to the left of the crack, some insecure stemming, and powerful laybacking to get up this one. And let me know how you manage to hang on long enough to place gear!  Belay in the alcove off the bolted anchor. 110 feet.

Jonathon finishing up pitch 4

Pitch 5: 5.10.  Start up a hand crack through a roof.  Continue up the amazing hand crack as it widens to a fist crack.  Before the crack goes into the chimney, step left onto a small ledge and build a gear anchor (0.5 and .75 cams). 150 feet.

Jonathon starting up the 5th pitch.

Pitch 6:  5. 8 R. Start up the chimney/offwidth and when it gets wide enough tunnel and squirm your way through  until you reach the other side.  Belay in the sunshine on a large ledge. 70 feet.

Pitch 7: 5.11c.  This is the endurance crux, especially since it's baking in the sun and is the last of several hard pitches. Follow the amazing right facing corner, starting with a steep thin hands crack then moving to a 2 - 3" hand crack.  A couple bulges and rests are found along with way. Save energy for the final crux at the end of the pitch (.4, .5 and #1 cams).  130 feet.

Starting up the final Indian Creek style splitter
Descent:  Two ropes are required for the descent.  From the top of the last pitch do a 150ft rap to the ledge with a bolted anchor.  A short rap (50ft) down to a large tree is next.  From the large tree 2 long rappels (~200 ft) will land you on a ledge system that you walk 100 ft back to the climbers left to reach the top of the 2nd pitch.  From here, we did two short rappels to the ground.  You can do 1 long rappel but getting the rope stuck is a big risk.


Gear:  A LOT! Triples in BD (1, 2, 3).  Doubles in BD (Green C3, Red C3, 0.4, 0.5, 0.75, & 4).  Single in BD purple C3, Metolius Blue and yellow tcu and small nuts and RPs.  12 draws ( half petzl ang finesse and half should length slings). Petzl 9.4 70 m rope and Petzl 8.2 60 m rope.  

We spent the rest of the trip trying to escape the wind on the uber-classic Dark Shadows and cragging some more at the Second Pullout.  It was a great trip.  As a bonus the desert began to bloom and blossom similarly expressing its own joy at the lovely springtime weather.